protocol-ssl
Overview
Handshake
SSL/TLS handshake is different between TLS1.2 and TLS1.3, but they have common concept.
The purpose of the SSL/TLS handshake is to perform all the cryptographic work needed to have a secure connection. This includes authenticating the SSL certificate being used, and generating an encryption key.
The TLS handshake accomplishes 3 main things:
- Exchanging cipher suites and parameters
- Authenticating one or both parties
- Creating/Exchanging symmetric session keys
Negotiating Cipher Suites
The first step of the TLS handshake requires the client and server to share their capabilities so they can find the cryptographic features they mutually support.
Once a client and server agree on the exact encryption methods they will use, this is called a cipher suite – the server sends the client its SSL certificate
Authentication SSL certificate
Upon its receipt, the client checks to make sure the certificate is “authentic.” This is an extremely important step. To truly have a secure connection, you can’t just encrypt your data, you also need to know it’s being sent to the right website/organization. SSL/TLS certificates provide that authentication.
During the authentication portion of the TLS handshake, the client performs several cryptographically secure checks to make sure the certificate provided by the server is authentic. This includes checking the digital signature and making sure the certificate originates from a trusted CA.
With the most common public key cryptosystem, RSA, the client will encrypt random data(pre-master-key) with the public key that needs to be used to generate the session key. The server will only be able to decrypt and use that data if it has the private key, which provides proof of possession.
Key Exchange
The last part of the TLS handshake involves creating the “session key,” which is the key that will actually be used for secure communication, both client and server compute the session key by them self based on (client random number, server random number, pre-master key)
Session keys are “symmetric,” meaning the same key is used for encryption and decryption. These keys can achieve strong encryption much more efficiently than asymmetric keys, making them appropriate for sending data back and forth in an HTTPS connection。
The exact method for generating the key varies based on the cipher suite that was chosen, with the two most common schemes being RSA and Diffie-Hellman.
To end the handshake, each party lets the other know they have done all the necessary work, then both run check-sums to make sure the handshake occurred without any malicious tampering or corruption.
TLS 1.2 Handshake
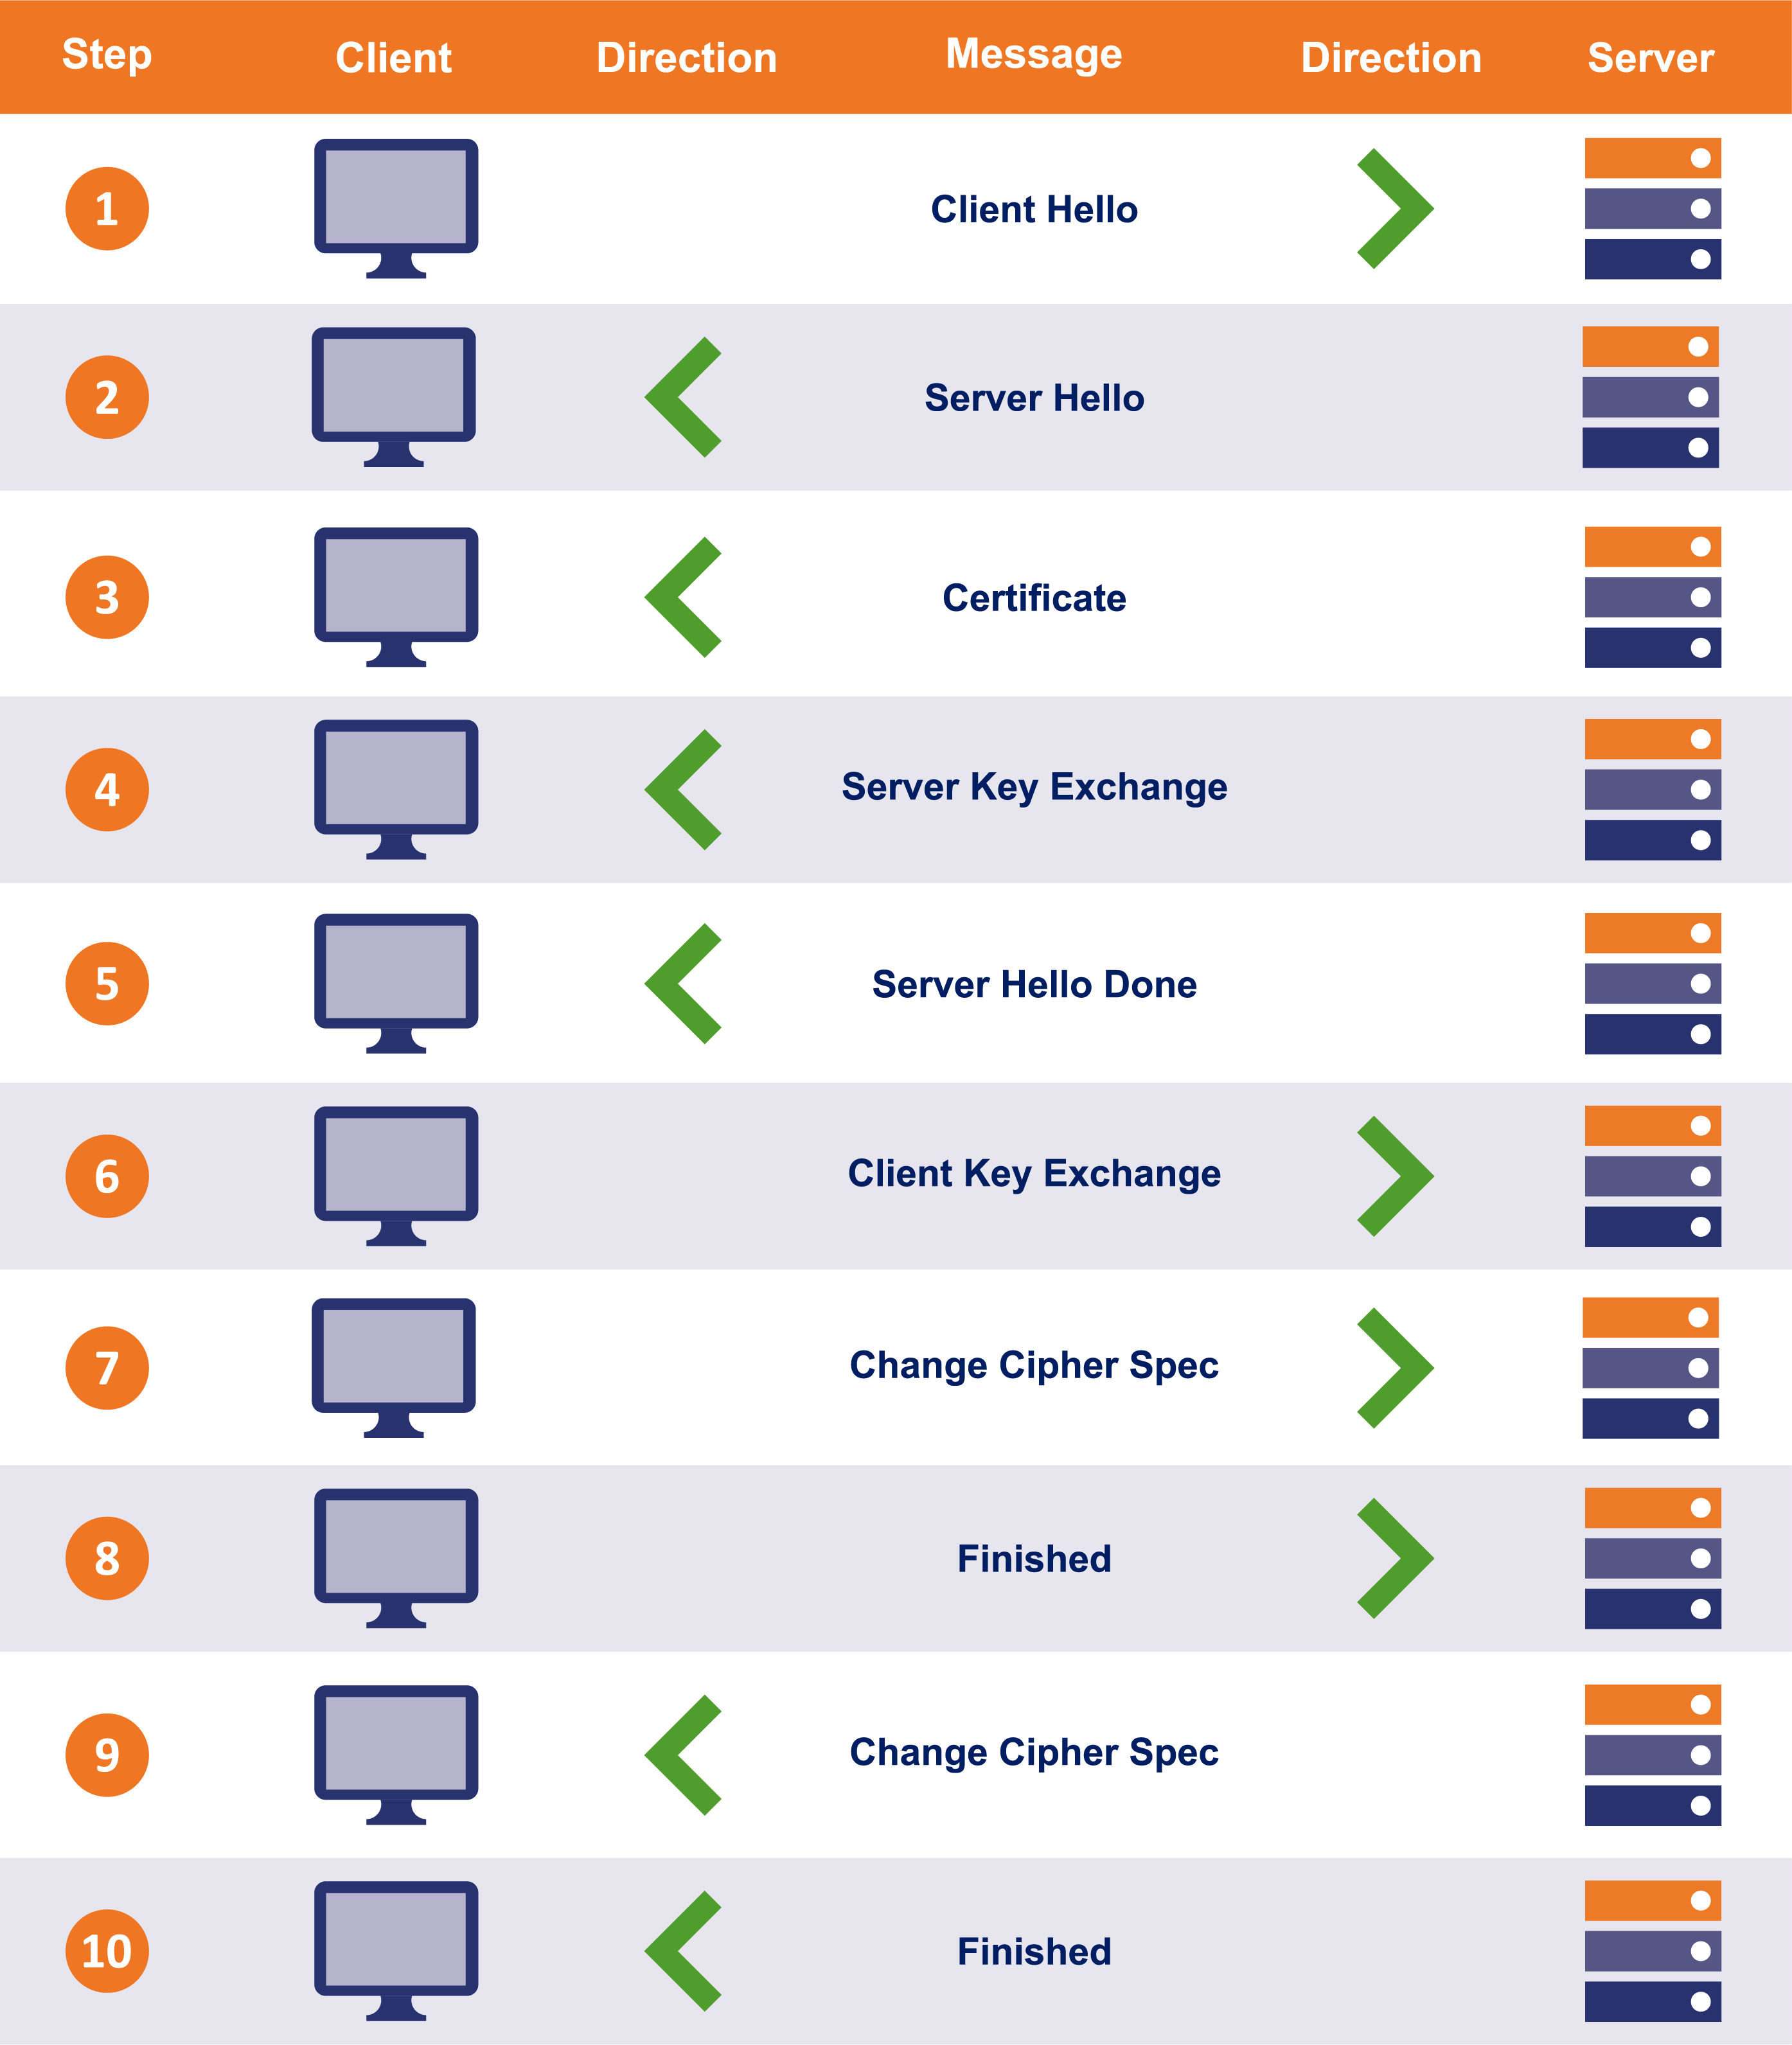
Please note this is just the logical process, several steps combine together and may send in one TCP packet.

The first message is called the “ClientHello.” This message lists the client’s capabilities so that the server can pick the cipher suite that the two will use to communicate. It also includes a large, randomly picked prime number called a “client random.”
The server politely responds with a “SeverHello” message. In this message it tells the client what connection parameters it has selected from the provided list and returns its own randomly selected prime number called a “server random.” If the client and server do not share any capabilities in common, the connection terminates unsuccessfully.
In the “Certificate” message, the Server sends its SSL certificate chain (which includes its leaf certificate and intermediate certificates) to the client. To provide authentication to the connection an SSL certificate is signed by a CA, which allows the client to verify that the certificate is legitimate. Upon receipt, the client performs several checks to authenticate the certificate. This includes checking the certificate’s digital signature, verifying the certificate chain, and checking for any other potential problems with the certificate data (expired certificate, wrong domain name, etc). The client will also make sure the server has possession of the certificate’s private key. This is done during the key exchange/generation process.
(OPTIONAL)[
Server Key Exchange]This is an optional message, only needed for certain key exchange methods (Diffie-Hellman) that require the server provides additional data.The “Server Hello Done” message tells the client that it has sent over all its messages.
[
Client Key Exchange] The client then provides its contribution to the session key.The specifics of this step depend on the key exchange method that was decided on in the initial “Hello” messages. In this example we’re looking atRSA, so the client is going to generate a random string of bytes called a pre-master secret, then encrypt it with the server’s public key and transmit it.The
“Change Cipher Spec”message lets the other party know that it has generated the session key and is going to switch to encrypted communication.The
“Finished” messageis then sent to indicate that the handshake is complete on the client side. The Finished message is encrypted, and is the first data protected by the session key. The message contains data (MAC) that allows each party to make sure the handshake was not tampered with.Now it’s the server’s turn to do the same. It decrypts the pre-master secret and computes the session key. Then it sends its
“Change Cipher Spec”message to indicate it is switching to encrypted communication.The server sends its
“Finished”message using the symmetric session key it just generated, it also performs the same check-sum to verify the integrity of the handshake.
After these steps the SSL handshake is complete. Both parties now have a session key and will begin to communicate with an encrypted and authenticated connection.
2, 3, 4, 5 may in one TCP message, 6.7.8 may in one TCP message, 9, 10 may in one TCP message.
Another way to see SSL handshake
TLS 1.3 Handshake
Cipher Suite
A cipher suite is a collection of algorithms that determine the parameters of a secure connection.
At the start of any connection, the very first interaction, the Client Hello, is a list of cipher suites that are supported. The server looks for the best, most secure option that is mutually supported and responds with its choice. You can look at a cipher suite and figure out all of the parameters of the handshake and the connection
TLS1.2
four distinct algorithms represented in TLS 1.2 cipher suites:
- Key Exchange(how to generate pre-master key)
- Authentication(how to valid certificate)
- Bulk Cipher(data encryption)
- Hashing Algorithm(data integrity check)
Example Format
- TLS is the protocol
- ECDHE is the key exchange algorithm
- ECDSA is the authentication algorithm
- AES 128 GCM is the symmetric encryption algorithm
- SHA256 is the hashing algorithm.
In the example above, we’re using Elliptic Curve Diffie-Hellman Ephemeral(ECDHE) for key exchange and Elliptic Curve Digital Signature Algorithm(ECDSA) for authentication. DH can also be paired with RSA (functioning as a digital signature algorithm) to accomplish authentication.
TLS 1.2 has 37 available ciphers in total, though not all of them are advisable. Here’s a list of the most widely-supported cipher suites:
TLS_ECDHE_ECDSA_WITH_AES_128_GCM_SHA256
TLS_ECDHE_ECDSA_WITH_AES_256_GCM_SHA384
TLS_ECDHE_ECDSA_WITH_AES_128_CBC_SHA
TLS_ECDHE_ECDSA_WITH_AES_256_CBC_SHA
TLS_ECDHE_ECDSA_WITH_AES_128_CBC_SHA256
TLS_ECDHE_ECDSA_WITH_AES_256_CBC_SHA384
TLS_ECDHE_RSA_WITH_AES_128_GCM_SHA256
TLS_ECDHE_RSA_WITH_AES_256_GCM_SHA384
TLS_ECDHE_RSA_WITH_AES_128_CBC_SHA
TLS_ECDHE_RSA_WITH_AES_256_CBC_SHA
TLS_ECDHE_RSA_WITH_AES_128_CBC_SHA256
TLS_ECDHE_RSA_WITH_AES_256_CBC_SHA384
TLS_DHE_RSA_WITH_AES_128_GCM_SHA256
TLS_DHE_RSA_WITH_AES_256_GCM_SHA384
TLS_DHE_RSA_WITH_AES_128_CBC_SHA
TLS_DHE_RSA_WITH_AES_256_CBC_SHA
TLS_DHE_RSA_WITH_AES_128_CBC_SHA256
TLS_DHE_RSA_WITH_AES_256_CBC_SHA256
TLS 1.3
TLS 1.3 has made countless improvements over its predecessors, which is good considering it was in development for about a decade. The IETF removed support for older outmoded algorithms and streamlined everything, shortening the entire handshake from two round trips to one and reducing the sizes of cipher suites from four negotiations/algorithms to two.
The number of supported cipher suites has also dropped from 37 to five. Here’s an example of a TLS 1.3 cipher suite:
- TLS is the protocol
- AES 256 GCM is the Authenticated Encryption with Associated Data (AEAD) algorithm
- SHA384 is the Hashed-Key Derivation Function (HKFD) algorithm
We(TLS 1.3) already know we’re going be using some version of Diffie-Hellman Ephemeral key exchange, we just don’t know the parameters, so that means that the first two algorithms in the TLS 1.2 cipher suite are no longer needed. Those functions are still occurring, they just no longer need to be negotiated during the handshake.
Here are the five supported TLS 1.3 cipher suites:
- TLS_AES_256_GCM_SHA384
- TLS_CHACHA20_POLY1305_SHA256
- TLS_AES_128_GCM_SHA256
- TLS_AES_128_CCM_8_SHA256
- TLS_AES_128_CCM_SHA256
SNI
why need SNI
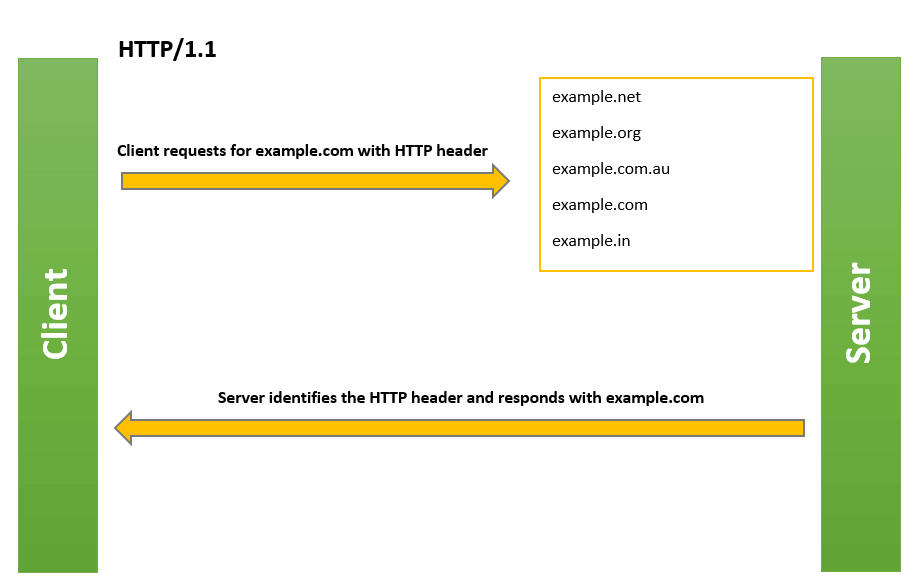
Let’s begin from an example, Let’s say you have two HTTP websites and you want to run them on a single IP address and port, how to config nginx to support this.
1 | http { |
when a user requests a particular site out of two, it uses a unique HTTP header(‘HOST’) that includes hostname.
nginx will use this header to match the request server, hence use that server to serve the request.

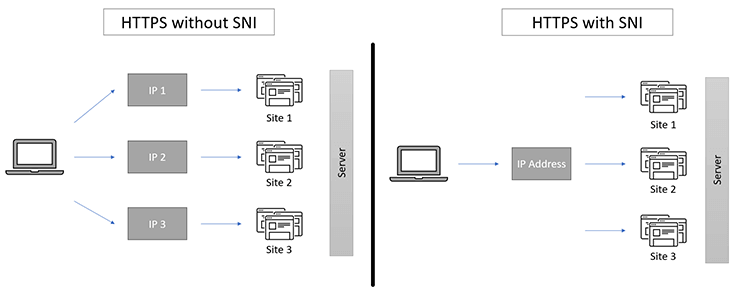
but this won’t work in the case of HTTPS, that’s because the HTTPS protocol uses an SSL/TLS handshake to enforce secure communications between the client (browser) and server. The HTTP header will only be sent once the handshake is over. during the handshake, we need to send server’s certificate to client, which server’s certificate should be sent is a problem because we do not have HOST header right now, before SNI, we must listen on different IPs to support different website, so that one IP<—–>one certificate, after SNI was introduced, no need to use different addresses.
what’s SNI
1 | http { |
as Server Name Indication (SNI), an extension to the SSL/TLS protocol, allows multiple SSL certificates to be hosted on a single unique IP address. SNI does this by inserting the HTTP header (virtual domain) in the SSL/TLS handshake. As the server is able to see the virtual domain at ssl handshake phase, hence send correct certificate and serves the client with the website he/she requested.

SSL certificate
Certificate is used for identification, like you’re a good man, I trust you, Or it’s good company, I can send my personal info to it!!
How to identify the certificate to know you’re good man?
As certificate is issued by CA encrypted with its private key(popular CA’s public key is always installed at PC), if we can decrypt the certificate and valid the field in it, Ok, you’re good man!!!
certificate contains company’s info and its public key! and encrypted with CA’s private key!!!

Actually, certificate contains two parts, one is CSR(public key+ basic info), the other is signature(CA signed use CA private key), then encode these two with BASE64. that means you can get the basic info and public key,without verify it, but you can’t trust them until you verify it(use CA public key)
Everyone should have a certificate if he/she needs to be identified by others. First he/she gives his/her certificate(like an ID) to the one she/he wants to talk, then the one ASKs CA(certificate authority ), if this guy is a good man(good company), did he register at CA? CA checks his db, ok, he is good man(good company), you can talk with he/her, or trust he/her. but be sure talk with encryption, so that others can NOT know what you’re saying!
Before SSL, what client/server needs to do?
client/server need to get their certificates and install CA, for two direction identification!
Install CA
Always the computer(OS) pre installed commonly used CA, organized like a tree(CA tree)1
2
3
4root(CA)
| |
| |
CA1 CA2Note: each CA entry contains CA’s public key! key point!!
(certificate is encrypted by CA’s private key)Get certificate
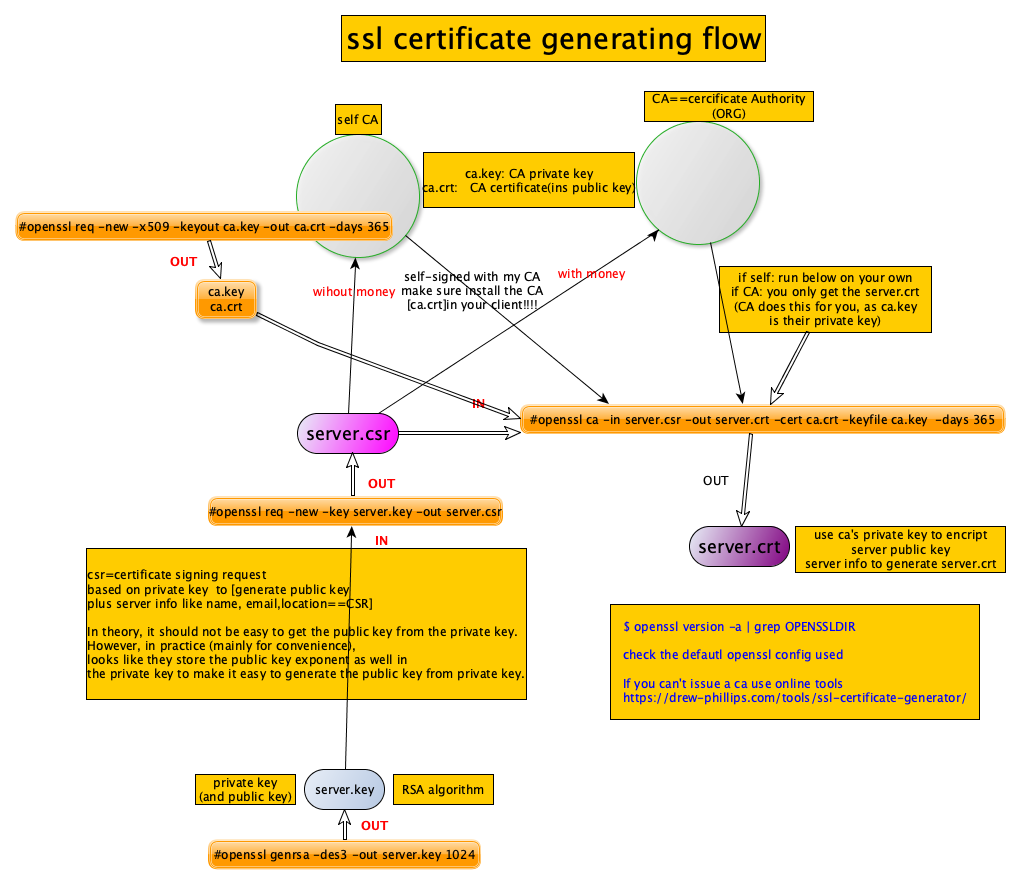
server(client) generates its own public/private keys, then send a CSR(certificate signing request) which contains its public key/company name, website etc to CA, CA encrypts these info with CA’s private key to issue a certificate! now server(client) has its certificate(encrypted with CA’s private key) which contains his public key, company info and signature.
Certificate format
X.509 - 这是一种证书标准,主要定义了证书中应该包含哪些内容.其详情可以参考RFC5280,SSL使用的就是这种证书标准.
目前有以下两种编码格式(实现方式).(PEM, DER编码格式)
PEM
Privacy Enhanced Mail,打开看文本格式,以”—–BEGIN…”开头, “—–END…”结尾,内容是BASE64编码.
查看PEM格式证书的信息:$ openssl x509 -in certificate.pem -text -nooutApache和NGINX服务器偏向于使用这种编码格式.
PEM – Openssl使用 PEM(Privacy Enhanced Mail)格式来存放各种信息, 它是 **openssl 默认采用的信息存放方式**。
Openssl 中的 PEM 文件一般包含如下信息:
内容类型:表明本文件存放的是什么信息内容,它的形式为“——-BEGIN XXXX ——”,与结尾的“——END XXXX——”对应。
头信息:表明数据是如果被处理后存放,openssl 中用的最多的是加密信息,比如加密算法以及初始化向量 iv。
信息体:为 BASE64 编码的数据。可以包括所有私钥(RSA 和 DSA)、公钥(RSA 和 DSA)和 (x509) 证书。
它存储用 Base64 编码的 DER 格式数据,用 ascii 报头包围,因此适合系统之间的文本模式传输。
使用PEM格式存储的证书:
1 | —–BEGIN CERTIFICATE—– |
使用PEM格式存储的私钥:
1 | —–BEGIN RSA PRIVATE KEY—– |
使用PEM格式存储的证书请求文件:
1 | —–BEGIN CERTIFICATE REQUEST—– |
Here is a certificate(encode with base64)
1 | -----BEGIN CERTIFICATE----- |
After decode with base64
1 | Certificate: |
As you can see that it contains basic info and public key and signature(signed with CA private key)
Certificate revocation list(CRL)
In cryptography, a certificate revocation list (or CRL) is “a list of digital certificates that have been revoked by the issuing certificate authority (CA) before their scheduled expiration date and should no longer be trusted.
Expiration dates are not a substitute for a CRL. While all expired certificates are considered invalid, not all unexpired certificates should be valid
Common Name(CN) vs Subject Alternative Name(SAN)
CN vs SAN
DER – 辨别编码规则 (DER) 可包含所有私钥、公钥和证书**
它是大多数浏览器的缺省格式,并按 ASN1 DER 格式存储。它是无报头的 - PEM 是用文本报头包围的 DER。
DER - Distinguished Encoding Rules,打开看是二进制格式,不可读.
查看DER格式证书的信息:$ openssl x509 -in certificate.der -inform der -text -nooutJava和Windows服务器偏向于使用这种编码格式.
证书编码的转换
PEM转为DER $ openssl x509 -in cert.crt -outform der -out cert.der
DER转为PEM $ openssl x509 -in cert.crt -inform der -outform pem -out cert.pem
(提示:要转换KEY文件也类似,只不过把x509换成rsa,要转CSR的话,把x509换成req…)
相关的文件扩展名
这是比较误导人的地方,虽然我们已经知道有PEM和DER这两种编码格式, 但文件扩展名并不一定就叫”PEM”或者”DER”,常见的扩展名除了PEM和DER还有以下这些, 它们除了编码格式可能不同之外,内容也有差别,但大多数都能相互转换编码格式.
CRT -
CRT应该是certificate,其实还是证书的意思,常见于 NIX系统,有可能是PEM编码,也有可能是DER编码, 大多数应该是PEM编码,相信你已经知道怎么辨别.CER -
还是certificate,还是证书,常见于Windows系统,同样的,可能是PEM编码,也可能是DER编码,大多数应该是DER编码.证书中没有私钥,DER 编码二进制格式的证书文件KEY - 通常用来存放一个
公钥或者私钥,并非X.509证书, 编码同样的,可能是PEM,也可能是DER.
查看KEY的办法 PEM 格式:$ openssl rsa -in mykey.key -text -noout
DER格式:$ openssl rsa -in mykey.key -text -noout -inform derCSR -
Certificate Signing Request,即证书签名请求,这个并不是证书,而是向权威证书颁发机构获得签名证书的申请,其核心内容是一个公钥(当然还附带了一些别的信息),在生成这个申请的时候,同时也会生成一个私钥,私钥要自己保管好.做过iOS APP的朋友都应该知道是怎么向苹果申请开发者证书的吧.
查看的办法:openssl req -noout -text -in my.csr (如果是DER格式的话照旧加上-inform der,这里不写了)PFX/P12 - predecessor of PKCS#12,包含公钥和私钥的二进制格式证书
对nginx服务器来说,一般CRT和KEY是分开存放在不同文件中的,但Windows的IIS则将它们存在一个PFX文件中,(因此这个文件包含了证书及私钥)这样会不会不安全?应该不会,PFX通常会有一个”提取密码”,你想把里面的东西读取出来的话,它就要求你提供提取密码,PFX使用的时DER编码,如何把PFX转换为PEM编码?
$ openssl pkcs12 -in for-iis.pfx -out for-iis.pem -nodes
这个时候会提示你输入提取代码. for-iis.pem就是可读的文本.
生成pfx的命令类似这样:$ openssl pkcs12 -export -in certificate.crt -inkey privateKey.key -out certificate.pfx其中CACert.crt是CA(权威证书颁发机构)的根证书,有的话也通过-certfile参数一起带进去.这么看来,PFX其实是个证书密钥库.
p7b - 以树状展示证书链(certificate chain),同时也支持单个证书,不含私钥。
JKS - 即Java Key Storage,这是Java的专利,跟OpenSSL关系不大,利用Java的一个叫”keytool”的工具,可以将PFX转为JKS,当然了,keytool也能直接生成JKS,不过在此就不多表了.
Openssl command
1 | # check certificate with .pem format |
