k8s_components
Kubernetes
Pod
A pod is a group of one or more tightly related containers that will always run together on the same worker node and in the same Linux namespace(s). Each pod is like a separate logical machine with its own IP, hostname, processes, and so on, running a single application.
when deciding whether to put two containers into a single pod or into two separate pods, you always need to ask yourself the following questions:
Two container in a single pod?
- Do they need to be run together or can they run on different hosts?
- Do they represent a single whole or are they independent components?
- Must they be scaled together or individually?
Static pod
Static pod is a kind of pod created before scheduler/api server starts by kubelet, kubelet scans /etc/kubernetes/manifests/ which is the place for static pod description.
Note: static pod which only runs on master node(s)
1 | $ ls -al /etc/kubernetes/manifests/ |
labels
Organizing pods and all other Kubernetes objects are done through labels, labels are a simple, yet incredibly powerful Kubernetes feature for organizing not only pods, but all other Kubernetes resources. A label is an arbitrary key-value pair you attach to a resource, which is then utilized when selecting resources using label selectors (resources are filtered based on whether they include the label specified in the selector).
A resource can have more than one label, as long as the keys of those labels are unique within that resource. You usually attach labels to resources when you create them, but you can also add additional labels or even modify the values of existing labels later without having to recreate the resource.
A label selector can select resources based on (key, value, equal, not equal) whether the resource
- Contains (or doesn’t contain) a label with a certain key
- Contains a label with a certain key and value
- Contains a label with a certain key, but with a value not equal to the one you specify
Annotations
A great use of annotations is adding descriptions for each pod or other API object, it is key-value pair, but not used as selector!
liveness probe(check container healthy)
Without health check(liveness probes), as long as the process is still running, Kubernetes will consider the container to be healthy, even your application goes into deadlock or infinite loop, K8s will NOT restart it.Kubernetes can check if a container is still alive through liveness probes, you can specify a liveness probe for each container in the pod’s specification. Kubernetes will periodically execute the probe and restart the container if the probe fails.
Kubernetes can probe a container using one of the three mechanisms:
An HTTP GET probe performs an HTTP GET request on the container’s IP address, a port and path you specify. If the probe receives a response, and the response code doesn’t represent an error (in other words, if the HTTP response code is 2xx or 3xx), the probe is considered successful. If the server returns an error response code or if it doesn’t respond at all, the probe is considered a failure and the container will be restarted as a result.
A TCP Socket probe tries to open a TCP connection to the specified port of the container. If the connection is established successfully, the probe is successful. Otherwise, the container is restarted.
An Exec probe executes an arbitrary command inside the container and checks the command’s exit status code. If the status code is 0, the probe is successful. All other codes are considered failures.
readiness probe(ready to handle request)
The readiness probe is invoked periodically and determines whether the specific pod should receive client requests or not.
Three types of readiness probes exist:
- An Exec probe, where a process is executed. The container’s status is determined by the process’ exit status code.
- An HTTP GET probe, which sends an HTTP GET request to the container and the HTTP status code of the response determines whether the container is ready or not.
- A TCP Socket probe, which opens a TCP connection to a specified port of the container. If the connection is established, the container is considered ready.
When a container is started, Kubernetes can be configured to wait for a configurable amount of time to pass before performing the first readiness check. After that, it invokes the probe periodically and acts based on the result of the readiness probe. If a pod reports that it is not ready, it is removed from the service(endpoint). If the pod then becomes ready again, it is re-added to service endpoint.
Readiness vs Liveness
Unlike liveness probes, if a container fails the readiness check, it will not be killed or restarted. This is an important distinction between liveness and readiness probes.
Liveness probes keep pods healthy by killing off unhealthy containers and replacing them with new, healthy ones, whereas readiness probes make sure that only pods that are ready to serve requests receive them.
If you don’t add a readiness probe to your pods, they’ll become service endpoints almost immediately. If your application takes too long to start listening for incoming connections, client requests hitting the service will be forwarded to the pod while it’s still starting up and not ready to accept incoming connections. Clients will therefore see “Connection refused” types of errors before it’s ready.
volume
Mostly a volume is bound to the lifecycle of a pod and will stay in existence only while the pod exists, but depending on the volume type, the volume’s files may remain intact even after the pod and volume disappear, here are list of volume types.
- emptyDir—A simple empty directory used for
storing transient data, deleted when pod is gone. - hostPath—Used for
mounting directories from the worker node’s filesystem into the pod. - gitRepo—A volume initialized by checking out the contents of a Git repository.
- nfs—An
NFS share mounted into the pod. - persistentVolumeClaim—A way to use a pre or dynamically provisioned
persistent storage - others by cloud provider
sharing data between multiple containers in a pod by emptyDir
The volume starts out as an empty directory, the app running inside the pod can then write any files it needs to it, because the volume’s lifetime is tied to that of the pod, the volume contents are lost when the pod is deleted
The emptyDir you used as the volume was created on the actual disk of the worker node hosting your pod, so its performance depends on the type of the node’s disks, but you can tell Kubernetes to create the emptyDir on a tmpfs filesystem (in memory instead of on disk). To do this,set the emptyDir’s medium to Memory like this:
1 | volumes: |
share files between host and pod(in the host) by hostPath
If a pod is deleted and the next pod uses a hostPath volume pointing to the same path on the host, the new pod will see whatever was left behind by the previous pod, but only if it’s scheduled to the same node as the first pod, it’s persistent, each pod shares files with node that it’s scheduled to, if pod is deleted and recreated on another node, it does NOT see the previous content as the node is different. this type of volume is useful for DaemonSet pod.
1 | volumes: |
share files across nodes by NFS or cloud provider method
1 | volumes: |
Persistentvolume and PersistentVolumeClaim
All the persistent volume types above have required the developer of the pod to have knowledge of the actual network storage infrastructure available in the cluster. For example, to create a NFS-backed volume, the developer has to know the actual server the NFS export is located on, we can decouple pods from the underlying storage technology, create a 'virtual storage' that takes care of underlying storage technology, let pod uses this 'virtual storage', new resources were introduced. They are Persistentvolumes and PersistentVolumeClaims.
As soon as you create the claim, Kubernetes finds the appropriate PersistentVolume and binds it to the claim, binding is done by Kubernetes not user, you just claim what you wants.
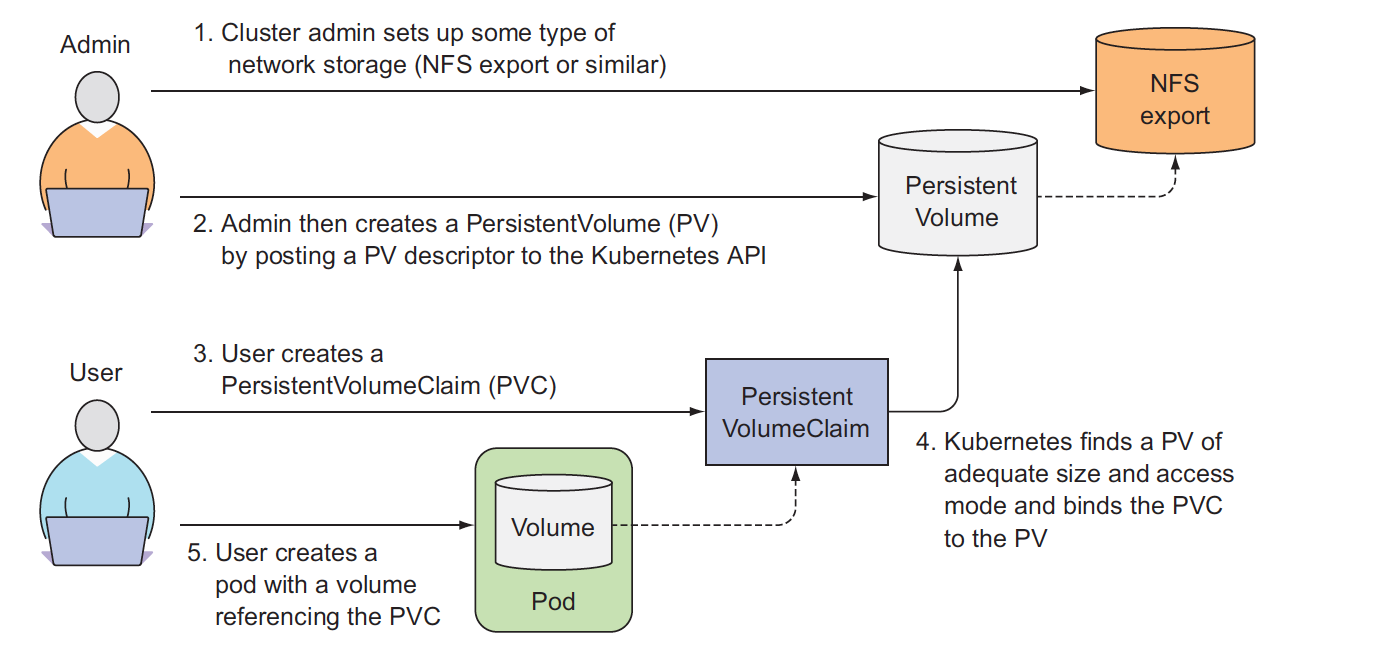
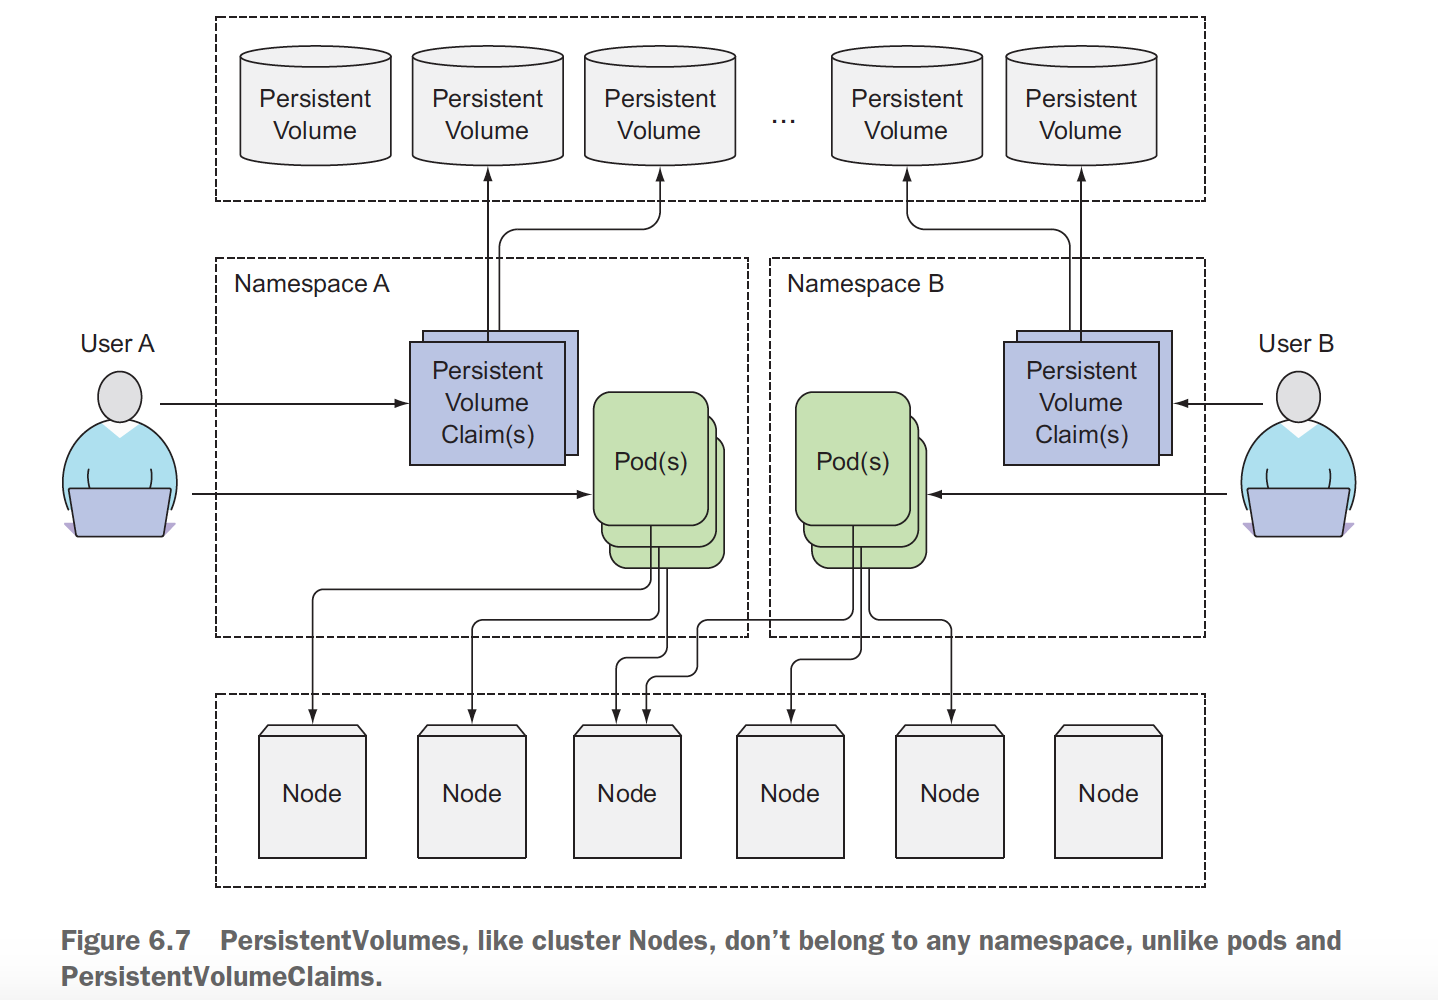
PersistentVolume resources are cluster-scoped and thus cannot be created in a specific namespace, but PersistentVolumeClaims can only be created in a specific namespace, they can then only be used by pods in the same namespace.
here just declare virtual storage disk, mongodb as backend
1 | apiVersion: v1 |
1 | apiVersion: v1 |
Use it from pod description
1 | volumes: |
Dynamic provisioning of PersistentVolumes
Can K8s create PV for us automatically, user only creates PVC? yes, it’s storageClass, the cluster admin, instead of creating PersistentVolumes, can deploy a PersistentVolume provisioner and define one or more StorageClass objects to let users choose what type of PersistentVolume they want. The users can refer to the StorageClass in their PersistentVolumeClaims and the provisioner will take that into account when provisioning the persistent storage.
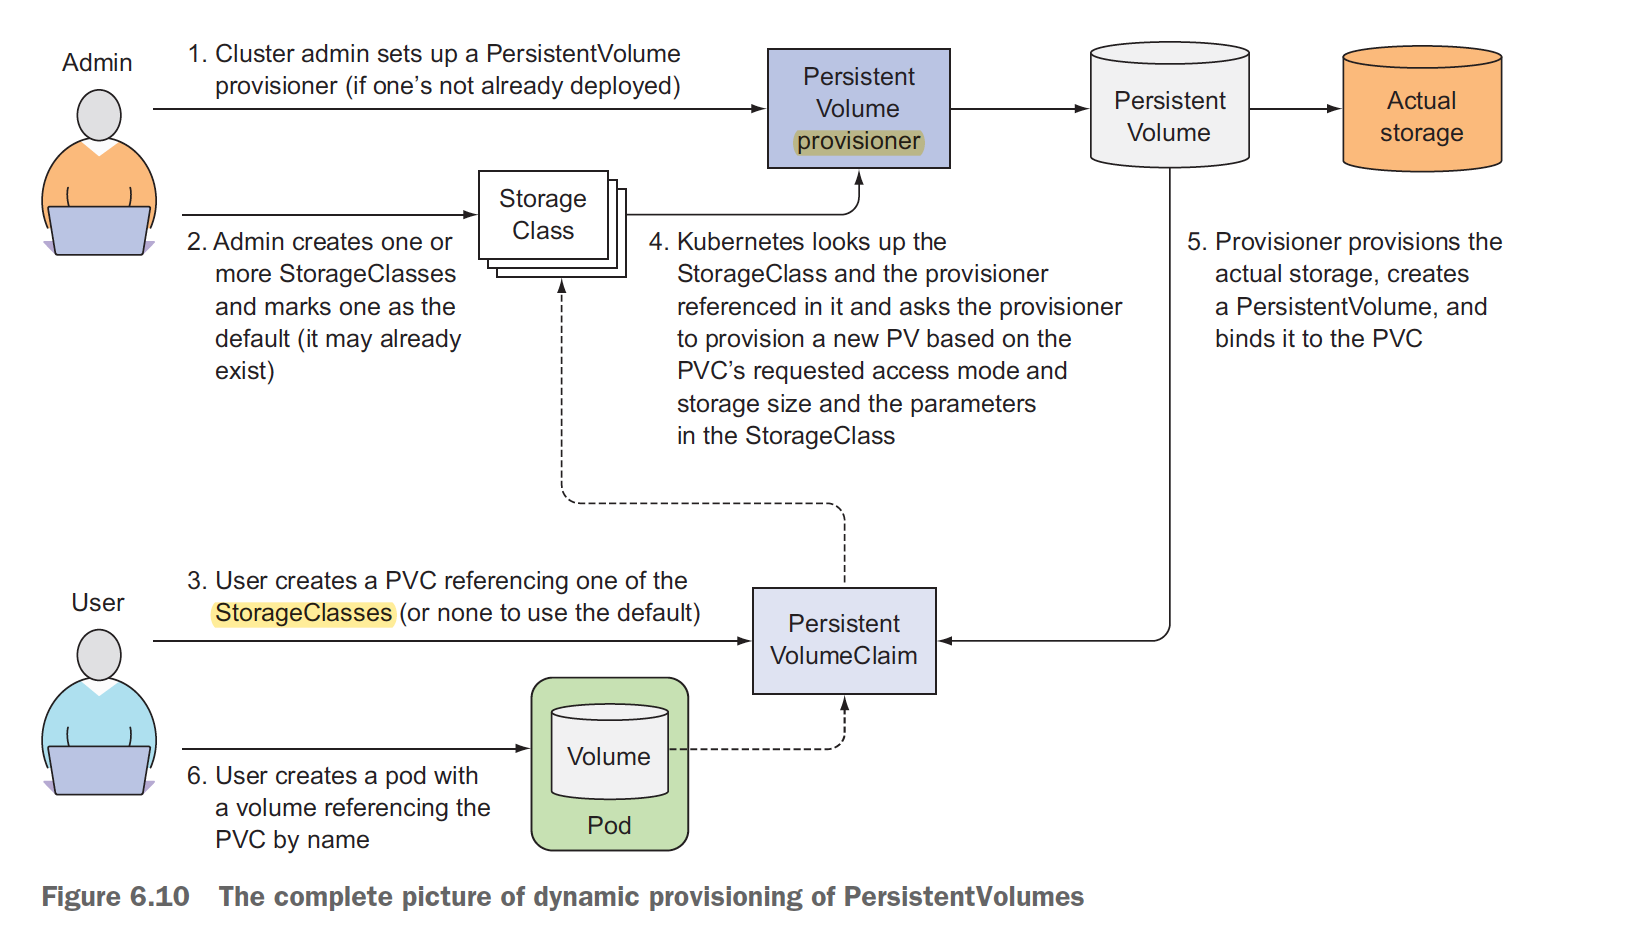
Behind Storage class it’s PersistentVolume provisioner who creates PV automatically.!!!
declare StorageClass
1 | apiVersion: storage.k8s.io/v1 |
Use storageClass in PVC instead of PV directly
1 | apiVersion: v1 |
Use VolumeClaim from pod description
1 | volumes: |
For all volumes, we need to mount it to pod for use
1 | containers: |
Namespaces
K8s Namespace like a container, limits the scope of the resources, so you can use same resource name in different namespaces, most of resources are namespaced, that means you need to give the namespace name when you list resource, without namespace given, ‘default’ namespace is used, check resource if it’s namespaced by $ kubectl api-resources.
Namespaces allow you to isolate objects into distinct groups, which allow you to operate only on those belonging to the specified namespace, but they don’t provide any kind of isolation of running object, it's only for viewing
Replication
Replication is used to create pod with several copies, monitor them, restart them or create new one if fails, make sure the number of running pod equals user desires, it uses label selector to select pod(s).
ReplicationController(deprecated)
A ReplicationController’s job is to make sure that an exact number of pods always matches its label selector. If it doesn’t, the ReplicationController takes the appropriate action to reconcile the actual with the desired number.
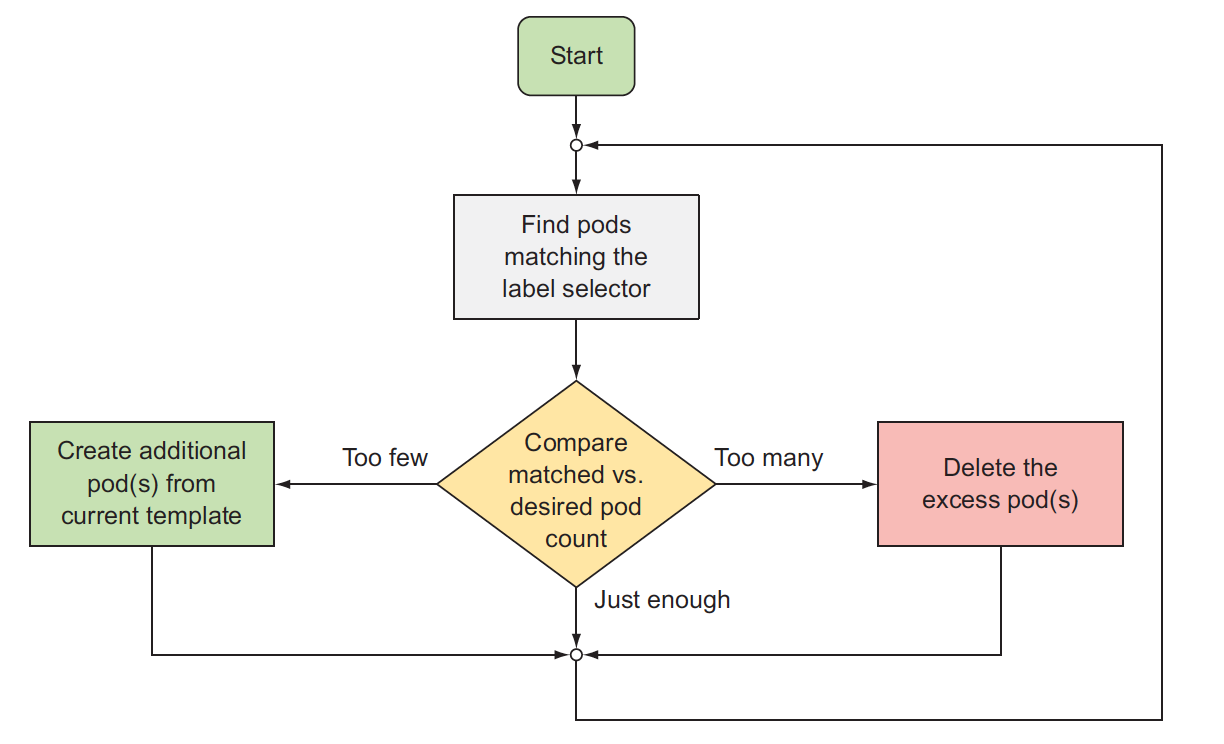
A ReplicationController has three essential parts:
- A label selector, which determines what pods are in the ReplicationController’s scope
- A replica count, which specifies the desired number of pods that should be running
- A pod template, which is used when creating new pod replicas
Changes to the label selector and the pod template have no effect on existing pods. Changing the label selector makes the existing pods fall out of the scope of the ReplicationController, so the controller stops caring about them.
ReplicaSet
It’s a new generation of ReplicationController, a ReplicaSet behaves exactly like a ReplicationController, but it has more expressive pod selectors, Whereas a ReplicationController’s label selector only allows matching pods that include a certain label, a ReplicaSet’s selector also allows matching pods that lack a certain label or pods that include a certain label key, regardless of its value.
DaemonSet
DaemonSets run only a single pod replica on each node, whereas ReplicaSets scatter them around the whole cluster randomly.
Cases like pods that perform system-level operations. For example, you’ll want to run a log collector and a resource monitor on every node.
Even node can be made unschedulable, preventing pods from being deployed to it. A DaemonSet will deploy pods even to such node, because the **unschedulable attribute is only used by the Scheduler, whereas pods managed by a DaemonSet bypass the Scheduler completely**.Job
Job is similar to the other resources replica, but it allows you to run a pod whose container isn’t restarted when the process running inside finishes successfully. Once it does, the pod is considered complete, in case of failure during running, the job(pod) can be restarted.
In the event of a node failure, the pods on that node that are managed by a Job will be rescheduled to other nodes the way ReplicaSet pods are. In the event of a failure of the process itself (when the process returns an error exit code), the Job can be configured to either restart the container or not.
By default, Job only runs once successfully, but you can run it more times, each run after another finish, more over, you can run jobs at same time by setting parallelism: 2 to allow run two same jobs at the same time.
CronJob
Job resources run their pods immediately when you create the Job resource, but many batch jobs need to be run at a specific time in the future or repeatedly in the specified interval, this is CronJob object. no difference with Job object except when it runs.
Service
A Kubernetes Service is a resource you create to make a single, constant point of entry to a group of pods(selected by label selector) providing the same service. Each service has an IP address and port that never change while the service exists. no interface for this ip, **ip is virtual just used to create iptable rules**, Clients can open connections to service IP and port, and those connections are then routed to one of the pods(may run on another node) backing that service. randomly selected (or RR selected with ipvs)pod which may or may not be the one running on the node the connection is being made to.
Service does NOT create pod like replication, but uses label selector to select pods(created by rs or deploy) as endpoints. when you create a service with label selector, an EndPoint object is created automatically which holds pod ip lists.
By default service load-balances request by randomly to it’s backend, but you can change its behavior by setting sessionAffinity: ClientIP
ClusterIP type internal service
For this kind of service, the service has a fixed cluster IP(auto assigned or manually set), cluster IP means it’s only accessible in the cluster. when such service is created, it only creates iptable nat rule(or ipvs rules), no interface configured with such cluster ip of service.
You have a few ways to make a service accessible externally:
Setting the service type to NodePort—For a NodePort service, each cluster node opens a port on the node itself (hence the name) and redirects traffic received on that port to the underlying service’s endpoint. The service isn’t accessible only at the internal cluster IP and port, but also through a dedicated port on all nodes.
you need to know node's ip to access the service.Setting the service type to LoadBalancer, an extension of the NodePort type—This makes the service accessible through a dedicated load balancer,
provisioned from the cloud infrastructure Kubernetes is running on. The load balancerredirects traffic to the node port across all the nodes. Clients connect to the service through the load balancer’s IP, you only need an load balancer’s ip for accessing the service also NodePort service can be accessed not only through the service’s internal cluster IP, but also through any node’s IP and the reserved node portCreating an Ingress resource, a radically different mechanism for exposing multiple services through a single public IP address,It operates at the HTTP level (network layer 7) and can thus offer more features than layer 4 services.
node port external service
NodePort service(node ip)—–>Pod(IP)
Even you access one node, the request may be routed to other node which has the service pod, but why we still need loadbalancer service type because when that node fails, your clients can’t access the service anymore, that’s why it makes sense to put a load balancer in front of the nodes to make sure you’re spreading requests across all healthy nodes and never sending them to a node that’s offline at that moment.
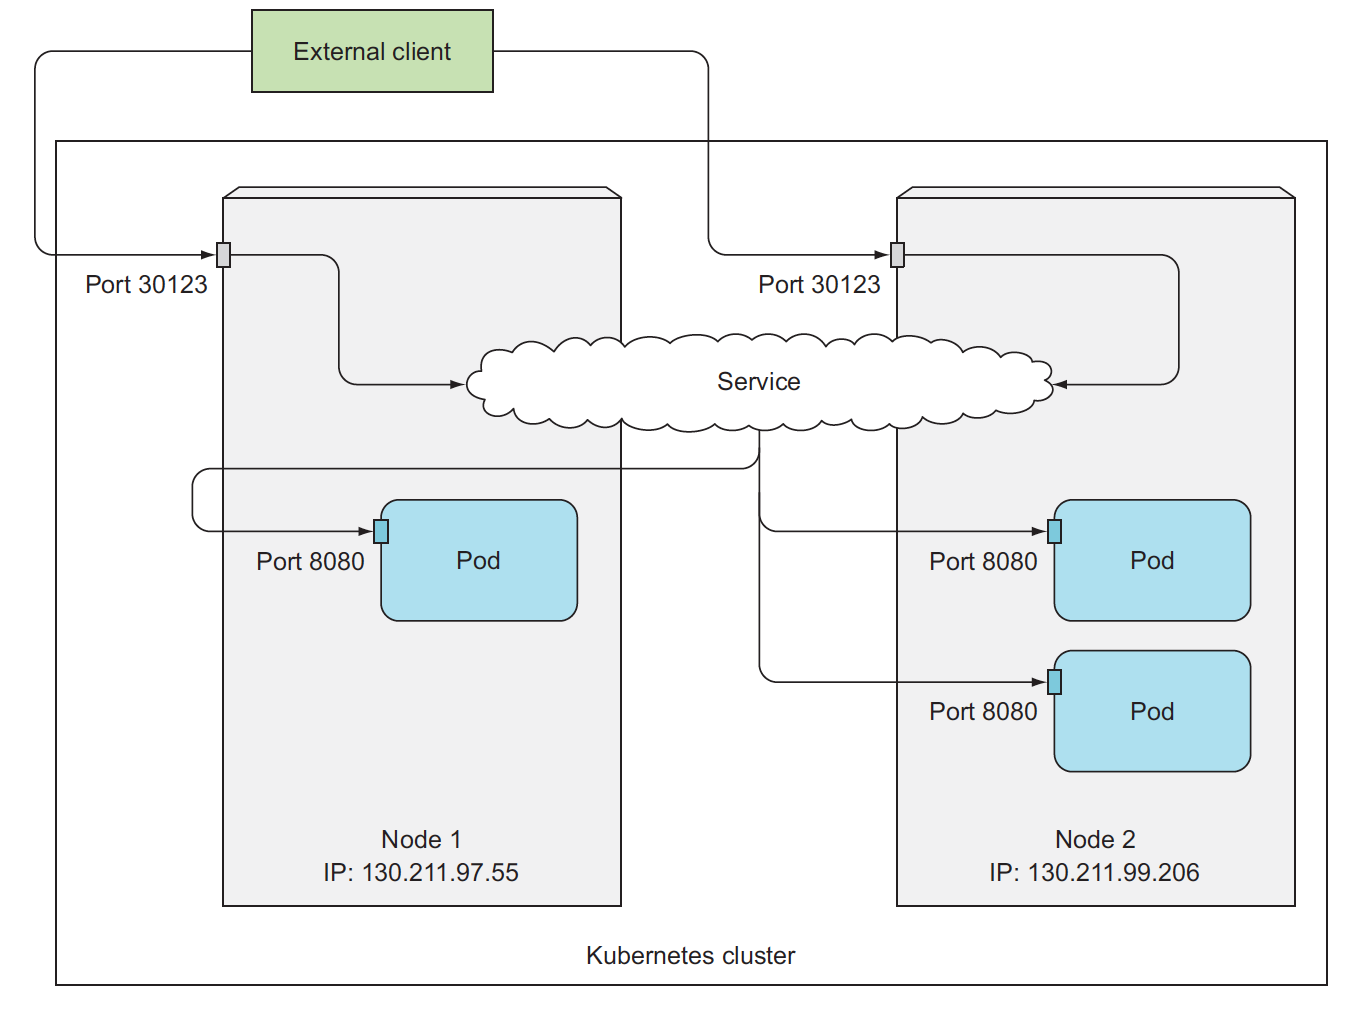
loadbalancer type external service
LoadBalancer service—>NodePort service(healthy node)—–>Pod(randomly selected or Client IP Or RR(ipvs) or WRR(ipvs))
Send request to healthy node. it needs cloud provider support!!!
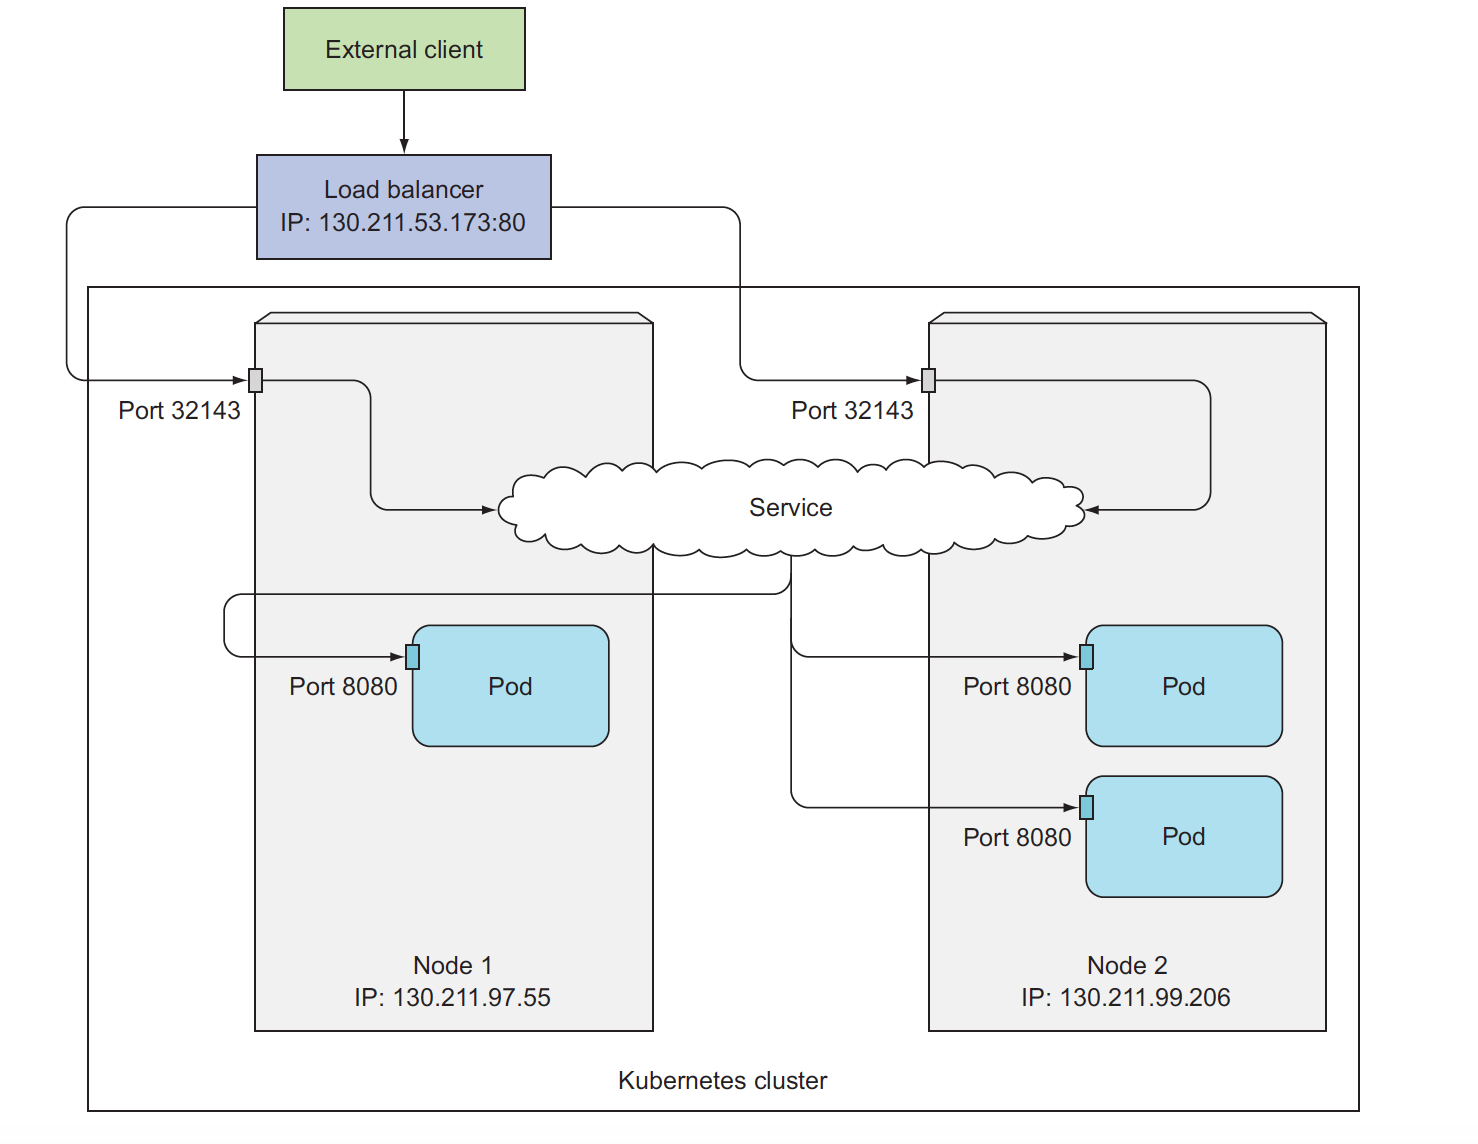
Ingress
Each service requires its own LoadBalancer with its own public IP address, whereas an Ingress only requires one, even when providing access to dozens of services.
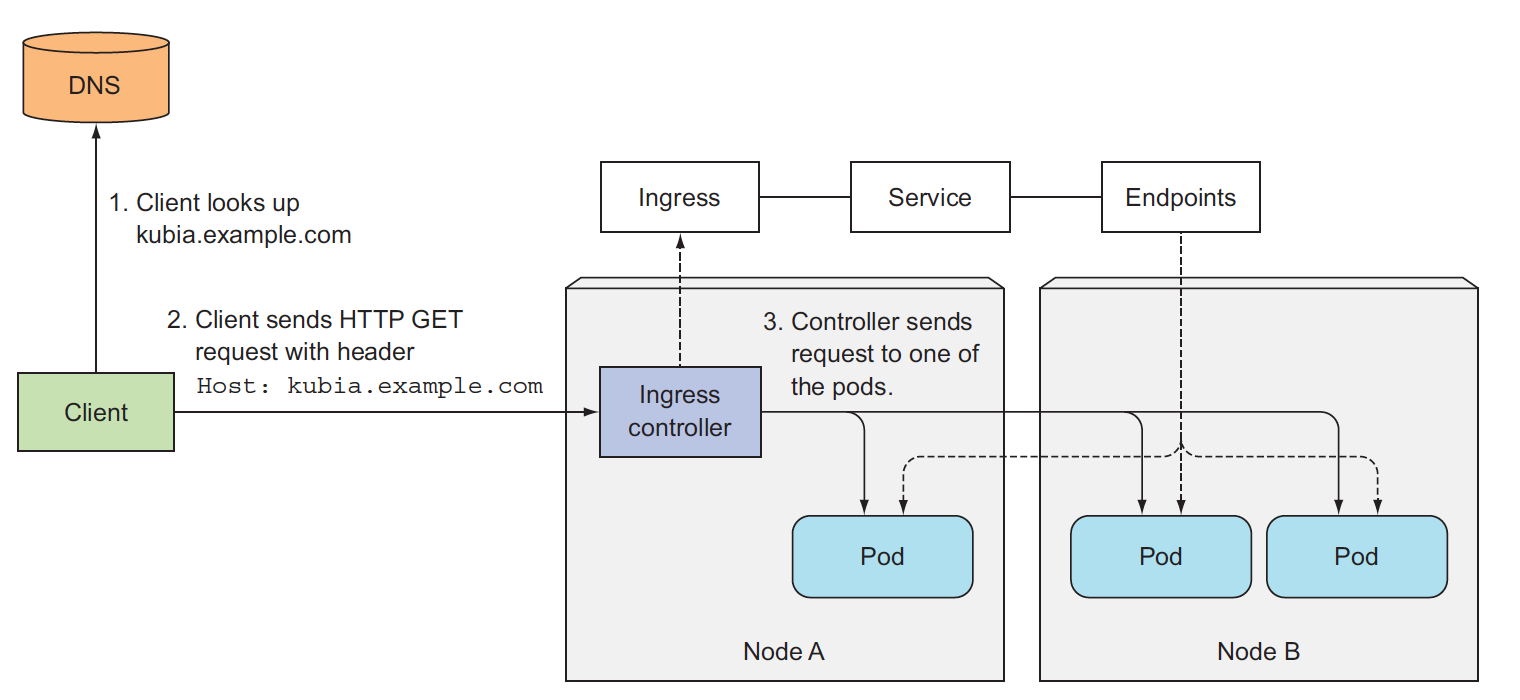
When a client sends an HTTP request to the Ingress, the host and path in the request determine which service the request is forwarded to, to make Ingress resources work, an Ingress controller(pod) needs to be running in the cluster. Different Kubernetes environments use different implementations of the controller.
When you create Ingress resource, actually, you push several lua rules into ingress controller, based on the lua rule, ingress controller sends the request to the proper pod which gets from service definition.
ingress requires clusterIP service as backend, ingress controller sends reqeust to pod directly not sends to clusterIP!!!
configMap, secret and downwardAPI
configMap and secret are used to pass any data to running container, while downwardAPI is used to pass Kubernetes metadata to running container.
configMap
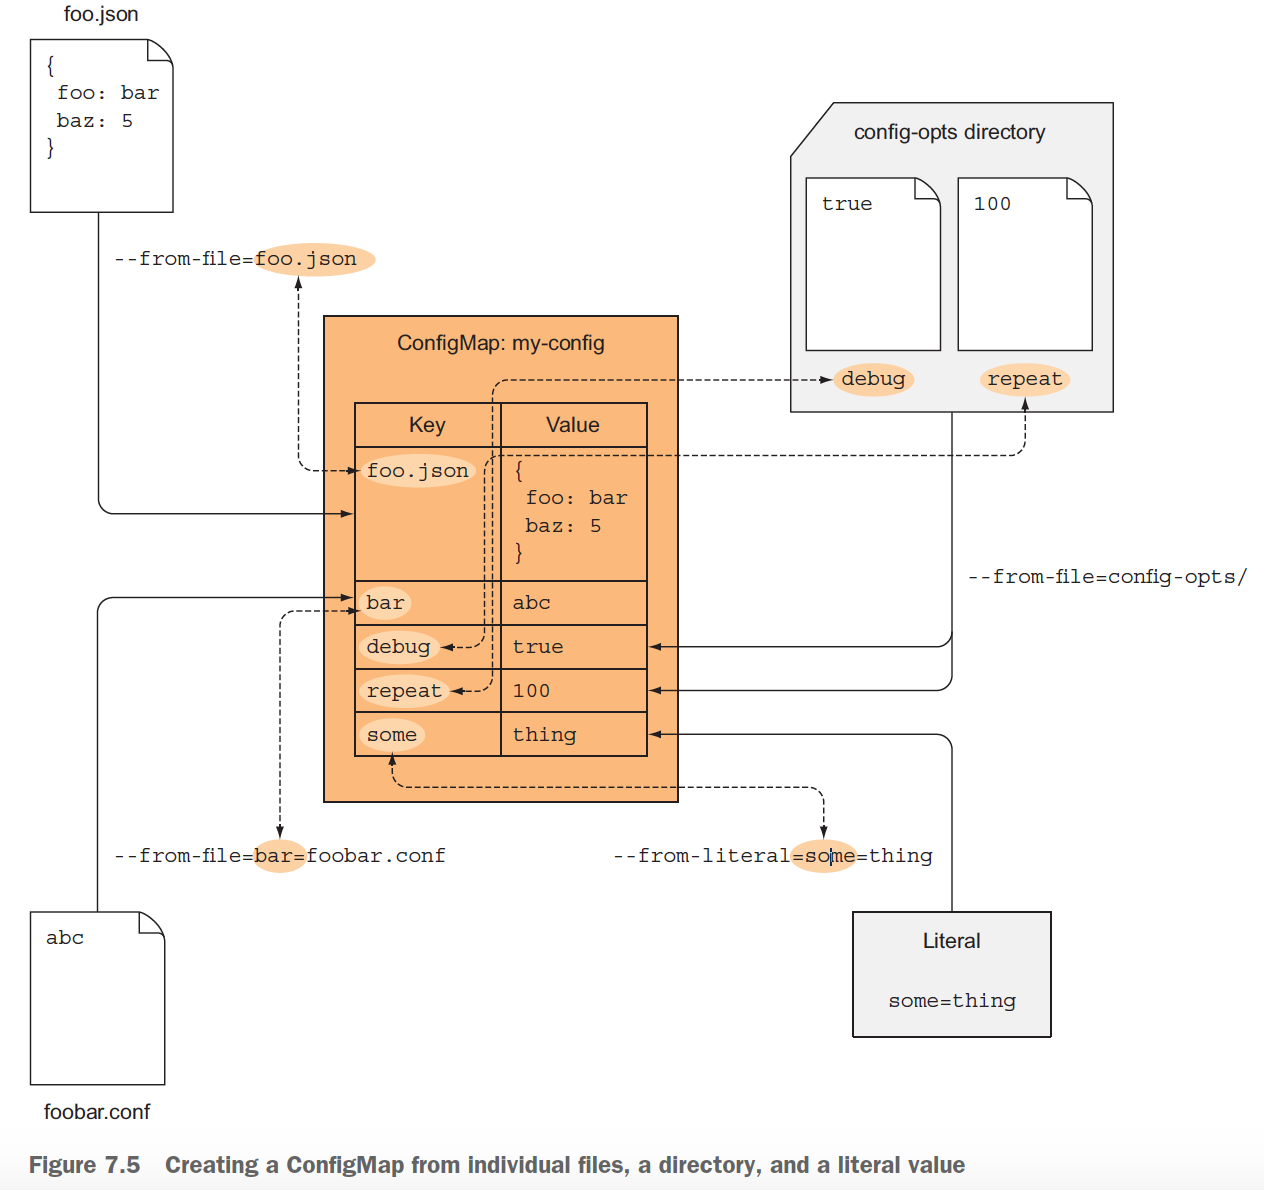
Kubernetes allows separating configuration options into a separate object called a ConfigMap, which is a map containing key/value pairs with the values ranging from short literals to full config files, that means the value can be a simple string or content of a file, the contents of the map are passed to containers either as environment variables or files in a volume.
Different between use configMap as env var and volume
- env var for short content, while volume for large content.
- env var is not updated after container starts, so update configMap, env var no change
- volume will be updated if you update configMap
secret
Secrets are much like ConfigMaps, they’re also maps that hold key-value pairs. They can be used the same way as a ConfigMap.
You can
- Pass Secret entries to the container as environment variables
- Expose Secret entries as files in a volume
secret is for sensitive data secrets are always stored in memory and never written to physical storage. On the master node itself (more specifically in etcd), Secrets used to be stored in decrypted form, which meant the master node needs to be secured to keep the sensitive data stored in Secrets secure.
The contents of a Secret’s entries are shown in different encode(encrypted) formats, whereas those of a ConfigMap are shown in clear text, when you see it by kubectl describe secrets. the showing format is determined by Secret type.
- generic secret: Base64-encoded
- tls secret: xxx
- service-account-token: yyy
When you expose the Secret to a container through a secret volume, the value of the Secret entry is decoded and written to the file in its actual form (regardless if it is plain text or binary). The same is also true when exposing the Secret entry through an environment variable. In both cases, the app doesn’t need to decode it, but can read the file’s contents or look up the environment variable value and use it directly.
downwardAPI
Kubernetes downwardAPI allows you to pass metadata about the pod and its environment through environment variables or files (in a downwardAPI volume), limits the passed data to running container.
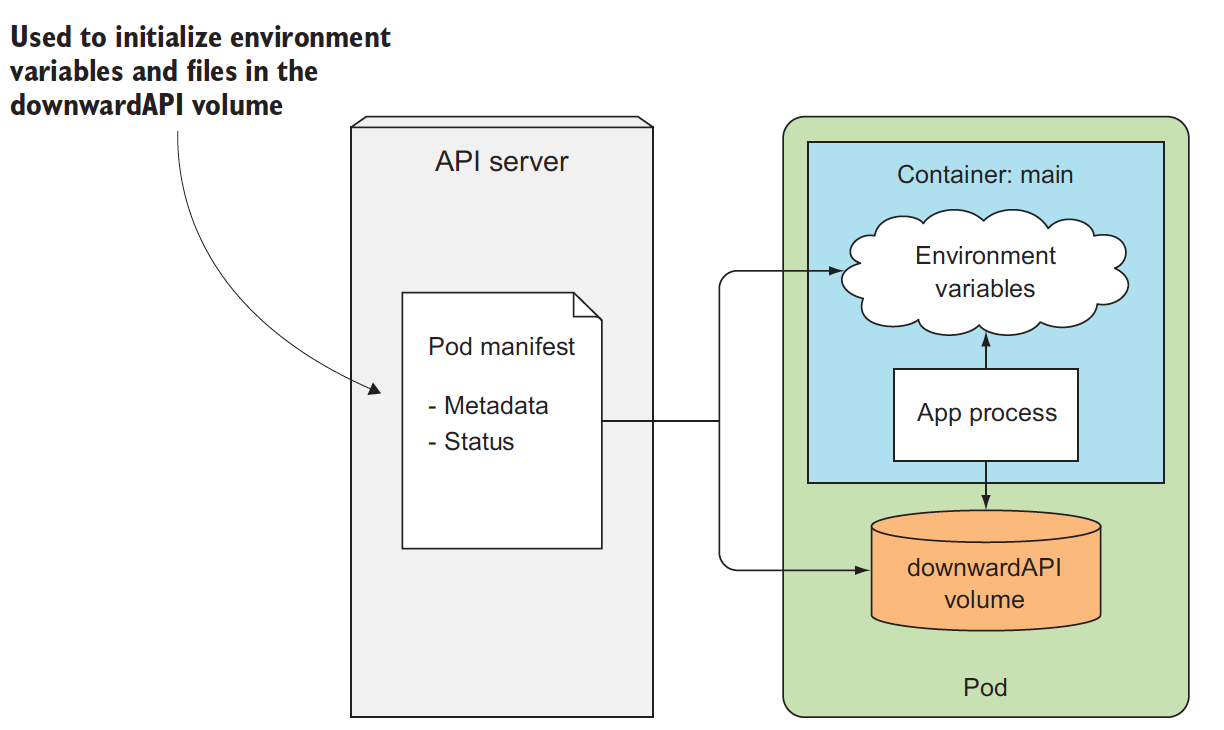
Metadata contains these:
- The pod’s name
- The pod’s IP address
- The namespace the pod belongs to
- The name of the node the pod is running on
- The name of the service account the pod is running under
- The CPU and memory requests for each container
- The CPU and memory limits for each container
- The pod’s labels
- The pod’s annotations
But the metadata exposed is limit, if you need more info about the cluster, talk to the API server directly in the pod, first we need to know restful API before we talk to it, but API server needs authentication, the kubectl proxy command runs a proxy server that accepts HTTP connections on your local machine and proxies them to the API server while taking care of authentication, so you don’t need to pass the authentication token in every request.
Deployment
Deployment aims to upgrade automatically, without deploy, using replicaSet, you need to upgrade(to new image) manually.
With deploy
- it will
create replicaSet automatically upgrade automaticallyat server side- still need create service
upgrade(rolling update way) without deployment
Rolling update: replace old pod one by one with new pod, not replace them at once! it needs two replicaSet for rolling update, old replicaSet scales down while new replicaSet scales up, this could be done by one command kubectl rolling-update kubia-v1 kubia-v2 --image=luksa/kubia:v2 kubia-v1 is old replicaSet, kubia-v2 is new will be created after you run such command,
it will do below step by step in client(call API server by kubectl):
- create new replicaSet
- scale up new replicaSet
- scale down old replicaSet
One big issue for this old way is that if you lost network connectivity while kubectl was performing the update, the update process would be interrupted mid-way. Pods and ReplicationControllers would end up in an intermediate state
While compared with deployment, all these actions above are done inside server, no API call, hence if something goes wrong, we can rollback to original state.
A Deployment is a higher-level resource meant for deploying applications and updating them declaratively, instead of doing it through a ReplicationController or a ReplicaSet, which are both considered lower-level concepts.
When you create a Deployment, a ReplicaSet resource is created underneath, the actual pods are created and managed by the Deployment’s ReplicaSets, not by the Deployment directly.
Creating a Deployment isn’t that different from creating a ReplicationController. A Deployment is also composed of a label selector, a desired replica count, and a pod template(like replicaset). In addition to that, it also contains a field, which specifies a deployment strategy that defines how an update should be performed when the Deployment resource is modified.
Default strategy is to perform a rolling update (the strategy is called RollingUpdate, no service down, good way). The alternative is the Recreate strategy, which deletes all the old pods at once and then creates new ones
Recreate strategy causes all old pods to be deleted before the new ones are Recreate created. Use this strategy when your application doesn’t support running multiple versions in parallel and requires the old version to be stopped completely before the new one is started. This strategy does involve a short period of time when your app becomes completely unavailable.
You should use rolling strategy only when your app can handle running both the old and new version at the same time.